Sunday, September 15, 2013

A detailed tutorial on how to create a awesome logo


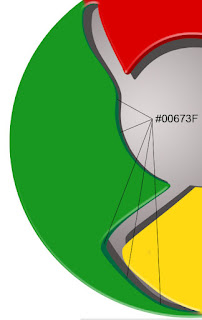
1.  Begin working by creating a new file (File>New) of 854×854 px and 72 dpi. Use on it theEllipse Tool (U) to represent the basis for the logotype to be of the Google Chrome browser.


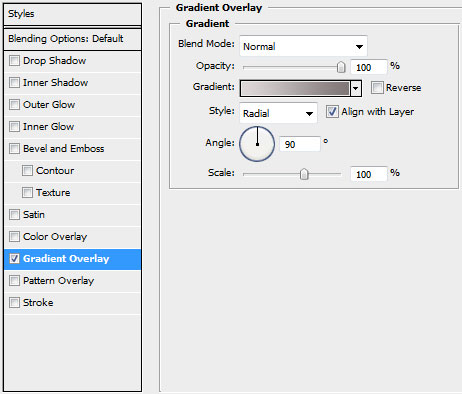
2.  Select for this layer the parameters from below by making a mouse click on this layer on the layers’ panel:Blending Options>Gradient Overlay 


3.  Using the same tool, try to make the next layer of the same element. Firstly apply the Ellipse Tool (U) to mark out the outside edges of the layer and then choose the Pen Tool (P) to cut out an inside opening. Its shape may be corrected with the Convert Point Tool. 


4. The layer’s parameters: Blending Options>Bevel and Emboss 


5. Make a copy of the recently made layer and use on it the Free Transform option. Press Maintain aspect ratioand make uniformly the copy smaller and then displace it easily. Move off the layer’s effect out of the copy. Select also the color #4E4A4A for the layer’s copy. Place the new layer under the previous one. This will be the shadow’s layer. 


6. Create a new layer and use on it a standard brush (Brush Tool (B)) to paint the logotype’s sectors. Press preliminary Alt button and make a mouse click between the top logotype’s layer and the new one. 


7. Make a new copy of the logotype’s layer and apply the Bevel and Emboss options for the copy. Use the Convert Point Tool to change the placement of the tops and move off the layer’s effect. Place this new layer lower than the logotype’s layer with the effect (Bevel and Emboss), but above the layer containing the logotype’s shadow. 


8. Create a new layer again situating it above the previous made one and do the same operations we did when painting the top layer (meaning the layer situated above the shadow’s layer, but lower than the logotype’s one). 


Online Photo Editor

Editing your images on a desktop image editor might be ideal, but sometimes you're away from your home workstation and need to do some impromptu editing. Here are some online image editors.


Designers and photographers have a number of options when it comes to photo editing. Of course, Photoshop is the most popular software, but there are a number of websites that allow you to edit photos online. Depending on your needs, the full version of Photoshop may not be necessary.


some websites are displayed here for editing photos online.


72Photos allows you to do basic edits and store your photos online. A free account includes 200 MB of disk space and 10GB of bandwidth, or the pro account is available for $14.95 per year.


AnyMaking includes basic functionality like cropping, re-sizing, drop shadows and refelections. It also makes it easy to add fun effects to photos, like the retro comic effect, cartoon effect, wanted poster, and more.

3. BeFunky

BeFunky Photo Effects allow everyday people to easily create photographically rich and artistic results from their digital images without the need for any technical knowledge. These “one-click” photo effect options produce desired results effortlessly and each effect comes with the option to make simple adjustments. BeFunky includes 147 effects that can be done with one click. In addition to the one-click effects you can perform basic tasks like cropping and re-sizing. A premium account is available for $9.95 per month that allows for priority processing, photo storage and more.  

4. BigHugeLabs

With BigHugeLabs you can quickly create things like CD covers, pop art posters, magazine covers, billboards and more using your own photos.


5. Dr. Pic  

Dr. Pic allows you to get started by uploading an image or entering a URL. It includes basic functionality like cropping and re-sizing, brightness and contrast adjustments, sharpen, adding text, and a little more.


6. FlauntR

With FlauntR you’ll need to register as a user before editing photos. It includes fetaures like one-click effects and a profile image creator for over 30 social networks.

With FotoFlexer you can get photos directly from your Flickr, Photobucket or Facebook account. It allows you to re-touch photos, create various effects, work with shapes and text, and more, including some advanced features.

Get started by uploading a photo or entering the URL of a photo. Free Online Photo Editor includes basic functionality like cropping, re-sizing, brightness/contrast adjustments, working with text, and a number of effects.

9. FunPhotoBox

The FunPhotoBox site is a place where you can create funny pictures from your photos. FunPhotoBox is a free photo editing online service. FunPhotoBox allows you to add special effects to your photos.


Image Chef includes a few different types of tools. You can use the sketchpad to create your own work, or you can create word mosaics, photo frames and more.
 
11. Imagic Photo Enhancer

Imagic Photo Enhancer is an easy to use digital photo enhancement software that instantly transforms your pictures into rich, glowing, beautiful images. Our photo enhancer was inspired and developed to do one thing.. to make your pictures look their absolute best. quickly, affordable, and easily.Now you can give all your pictures a professional touch without the need for fancy, expensive studio equipment. Imagic Photo greatly improves the quality and visual appeal of your images.

12. Lunapic 

Lunapic is a feature-rich online image editor. You can work with existing photos or create new images. There are tons of effects to choose from, and many adjustments that can be made, plus drawing tools, anitmation, and more.

13. MyImager

MyImager allows you to work with an existing photo via upload or a URL. Additionally, you can create a new image and work with the tools that are available, including a number of adjustments and effects, drawing tools, and more.


With Online Photo Tool you can do basic editing, and images can be saved if you register. Functionality includes re-size, crop, add text, sharpen, rotate, flip, colour balance, saturation, levels, and more.


 15. PicArtia

Create photo mosaic Online and Free! A powerful photo collage maker in 3 easy steps. Get your photo montage in less than 2 minutes!

16. Picnik

With Picnik you can grab photos from your Flickr, Photobucket or Facebook account easily. Picnik includes advanced controls and effects in addition to basic options like cropping and re-sizing. A premium version is also available with more features for a little over $2 per month. 
 

Adobe offers a free, online version of Photoshop with scaled down features that include those needed for basic photo editing. You can crop and re-size, apply basic touch ups, work with color, or edit the photo by adjusting the sharpness, focus and more.


Aviary provides a suite of related tools, including an image editor named Phoenix. Phoenix includes basic and advanced editing tools and features. The interface is easy to use and resembles that of a stripped down version of Photoshop.


Pixlr offers Pixlr express for basic editing like cropping and re-sizing, adjustments, and photo effects. The full version includes a lot more functionality that allows you to create an item from scratch or edit an existing photo. The full version works similar to Photoshop or GIMP with a lot of different tools that can be used.

20. Pixenate 

Get started with Pixenate by uploading a photo, entering a URL, or get one from your favorite photo sharing website. It includes basic editing features like cropping and re-sizing, brightness adjustments, and drawing lines on photos.


With Picture2Life you can perform basic edits, create collages, and share your photos. The editing features are very limited.

22. Phixr

You can start using Phixr by uploading a photo from your computer or by entering the URL of an image, or pull it from a photo sharing site. You can do basic things like crop or re-size, or use the other options like red eye removal, camera and lense effects, blur, and more.

23. PiZap

 PiZap helps you to have some fun with your photos by adding speech bubbles, cutout faces, effects and more.


24. Pho.to

With Pho.to you will upload a photo from your computer or enter a URL for the photo. It offers options like cropping and re-sizing, color enhancement, and several artistic effects. You can also automatically create a caricature from a photo.


25. Pixer.us

Pixer.us allows you to upload a photo from your computer, and perform basic editing and touch ups. You can crop and re-size, plus adjust things like brightness and contrast, saturation, sharpness and more.


Huge collection of photo templates, which will keep You busy for quite a while. With Photo505 you can upload a photo and choose from a number of pre-made effects and filters to apply to your photo.

 27. Poladroid

Poladroid allows you to turn your photos into polaroid-style photos. You must download the Poladroid app before working with any photos.


With Pixisnap you can create mosaics or polaroid tiles out of your images.

29. Photovisi  

Photovisi helps you to make attractive collages from your photos.


With Fix Picture you can do basic editing like cropping and re-sizing. Effects are also available for focus, contrast, sharpness, and more.


Pic Treat is a free tool that automatically retouches photos, including skin smoothing and red-eye removal.


Write On It makes it easy to create photomontages, cards, magzine covers, and more. Upload your photo and create your own effects on the photo.       
 
 
Splashup provides a nice interface and a number of tools and features. You can start from scracth, upload a photo from your computer, enter a URL, or get a photo from Flickr, Facebook and others. Splashup offers a surprising number of options for a free online image editor.


Other funny Photo Making Sites
Deefunia, Pic Joke, MagMyPic, PhotoFunia, FunnyWOW, LooGix, funny.pho.to, Makeup.pho.to, Tilt Shift Maker,  

Photoshop Text Effect

Typography means a lot in any medium kind of presentation. Whether it’s a logo, banner or just a title; being able to inject creativity into it not only help in delivering the message across, it also leaves solid impression on the viewer. Good typography design is not easy, or should I say getting the type match and speaks for the product is often a very challenging job.

How to Make A Text Effect?


You should download the brush set before we get started.

Step 1


Lets go ahead and begin by opening a new document in Photoshop. Mine is 540×300 pixels at 72ppi.

Since stitching on a plain white canvas is a little silly, lets go ahead and spice up the Background layer with a little texture. By default the Background layer in any new Photoshop document is locked, so lets go ahead and double-click on the Background layer in the Layers palette to bring up the Layer Properties dialog box. Simply rename the layer or name it Background once again and hit OK to unlock the layer.


Step 2

Now that our Background layer is unlocked we’re going to add a Pattern Overlay Layer Style to it which will give us a quick and easy denim background to work with.

Control-Click (PC: Right-Click) on the Background layer in the Layers palette and choose Blending Options from the menu. This will bring up the Layer Styles dialog box. Click on the Pattern Overlay text in the left column. (You must click on the text and not on the checkbox. Clicking the checkbox will turn the style ON but it won’t give you the options for the style, so it is important to click on the text so we can modify the Pattern Overlay style options.)

Next we need to load a new set of Patterns into the Pattern Picker. Click on the Pattern swatch to reveal the Pattern Picker, then click the little circle with the arrow in it at the top right corner of the picker. Choose "Patterns 2" from the list and click OK to load the new pattern set into the Pattern Picker. Now simply click on the Denim swatch which is the 4th pattern in the set and click OK to close the Layer Styles dialog box and commit the style to the layer.

Yes, I know, this graphic is a mess… but hopefully it gets the point across.


Step 3


You should now have a background full of denim and a layer style icon in the Background layer of the Layers palette.


Step 4

It’s now time to add some text to our document. Press the D key to reset the foreground color to black, then press the T key to invoke the Type tool. Click on the stage to place the cursor and type some text onto it. Notice that when you added the text that Photoshop automatically added a new layer for it.
(*note: To commit the text you can either press the Enter key on the 10-key corner of your standard keyboard or click the Check-Mark in the Text Tool options bar at the top of Photoshop.)


Step 5

Now that our text is created and while we still have the Type tool chosen we need to create an outline path of the letters. Control-Click (PC: Right-Click) on the text on the stage and choose Create Work Path from the menu. This will create a white outline around each letter indicating that you’ve created a work path (obviously) which we will use later in the lesson to stitch around.


Step 6

Add a new layer above your text by clicking the Add New Layer icon at the bottom of the layers palette or by using the keyboard shortcut Command-Option-Shift-N (PC: Ctrl-Alt-Shift-N). Rename the layer by Double-Clicking on the layers name in the Layers palette. I called this new layer Stitches.


Step 7

Now it’s time to setup everything in preparation for the stitching, and the first thing we need to do is load the stitching brush set into our Brushes palette. If you haven’t downloaded them yet you’ll want to do it now by clicking HERE. Save the brush set to your desktop or someplace you’ll remember when we go looking for them.

Press the B key to invoke the Brush tool, then bring up the Brushes palette by choosing Window>Brushes from Photoshop’s main menu. In the upper right hand corner of the Brushes palette, click on the options icon and choose Load Brushes from the menu. Navigate to the brush stitches brush set that you just downloaded to your hard drive and click Load. You will then be asked if you want to Append the brushes to the end of your current brushes or if you want to replace the existing brushes by clicking OK. For my example I’m going to replace my existing brushes, but either option works fine.

 Step 8

 Now that the brush set has been loaded into the Brush Picker lets go ahead and select the V-shaped brush. We’ll need to make a few adjustments to the settings in the Brushes palette for this brush to make it work the way we want.

First off lets reduce the size of the brush to around 8 pixels in the Diameter setting then make sure the Spacing checkbox is checked and that the spacing is set to around 80%. The spacing change makes the V’s overlap enough to look like interlocking stitches.

Step 9

While still in the Brushes palette click down to the Shape Dynamics link on in the menu on the left and make sure that the Angle Jitter control is set to Direction. This will make the brush rotate as it goes around the corners to the different sides of our letters.

Step 10

 At last it’s time to make the magic happen. Put on your wizard hat and swap the foreground and background colors by pressing the X key (white should now be showing as the foreground color at the bottom of the Tools palette). Press the P key to switch to the Pen tool and then Command-Click (PC: Right-Click) anywhere on that little white outline that is the Path around the text. Choose "Stroke Path" from the menu, make sure that "Brush" is selected from the drop-down menu and that the Simulate Pressure checkbox is un-checked then click OK.

You’ll now see that the brush we chose has been used to stroke the entire path of the text. Since we’re done with the path now you can either click over to the Paths tab in the Layers palette and delete it, or simply press Command-H (PC: Ctrl-H) to hid it.

Step 11 

To make the stitches a little more realistic lets go ahead and add a few layer styles to the Stitches layer. Just like we did in Step #1 lets Command-Click (PC: Right-Click) on the Stitches layer and choose Blending Options. Now add a Drop Shadow and a Bevel and Emboss as shown below, be sure to check each setting to make sure you haven’t missed anything then click OK.

The slight Bevel and Emboss will add a little more dimension to the thread while the Drop Shadow will add a touch of shading around the edges.

Step 12

Before we move on let me show you a cool little trick to change the background color. Since the background is a preset color pattern and not an overlay we can’t just change an underlying layer color so we have to resort to other methods. Click on the Background layer in the Layers palette to make it the active working layer. Now lets add an adjustment layer by clicking on the Create A New Fill or Adjustment Layer icon at the bottom of the Layers palette (it’s the circle with half black and half white), choose Hue/Saturation and use these settings (or any that look pretty to you).

Step 13

The last little bit of adjustment I did was to click over to the Text layer in the Layers palette and change it’s Blend Mode to Multiply and it’s Fill opacity to 70%. By doing this we allow a little of the denim texture to come through onto our black letters adding a little depth and realism.

(*note: You could also paste some real fabric into a layer above the Text layer and use a clipping mask to add even more coolness.)


Step 14

Anytime you’re using a text to create this effect you will always have an outline of the lettering, but what if you just want to stitch letters? Well, if you’ve got a little experience with the Pen tool you can apply this same technique to any number of paths you’ve drawn yourself.
Below I’ve used the pen tool to draw some text.

Step 15

Then I switched to the Brush tool, lowered the diameter of the brush to 6 pixels, switched back to the Pen tool and Stroked the path just like we did back in Step 10.

I then added the same Bevel & Emboss and Drop shadow to this new layer of stitches as we did to the original text.


Step 16

 In my final image I simply embellished on the techniques we’ve learned. Check out the .PSD download to view all my final adjustments!